Monday, March 26, 2012

Dove Love

Meet my lovey dovey:

She's what I came up with when I set out to draw a design to screen print onto a T shirt for my best girlfriend's birthday (who turned...ahem...29...again).  I love how she's folk art inspired, yet modern in her own way.

I added the "Choose Joy" because I've been quite inspired by a lady I've never met who chooses joy every day - and if anyone has a reason to mope around, it's her given what she's been hit with.  It is quite evident in her blog posts that I've followed for over a year now that she's carrying on her father's motto of choosing joy.  Visit Lil' Blue Boo to read more about that.  You will find Ashley, the author, to be funny, crafty, honest and raw.  She's someone I'd love to meet in person over a cup of coffee. 

But for now, I'm going to go about my day finding my own joy and maybe spreading it here and there on a t-shirt or two!


 There ya are, you cute little thing!


A "B" for Me

I love it when a craft I have planned turns out better than I thought it would, even if it is through an epic fail.  I originally started out with the plan to Mod Podge fabric scraps onto a plain B for the table top wreath holder my mother-in-law gave us a few weeks ago.  She gave us a Valentine's themed wreath to hang on it, which I did, but after the holiday I decided I needed to find something that could be "year round".

After my failed Mod Podge attempt where it looked like fabric threw up on my B, I moved onto wrapping yarn.  I didn't do a tutorial, because you can find these plastered all over Pinterest right now.  I added a ribbon for the hanger, hot glued under the yarn so it is hidden, and a felted wool flower I found at our local craft store majorly on sale (LOVE those finds!).  I love the color it brings to my room, all under $5 AND using up some scrap yarn I had no other ideas for! 

Saturday, March 10, 2012

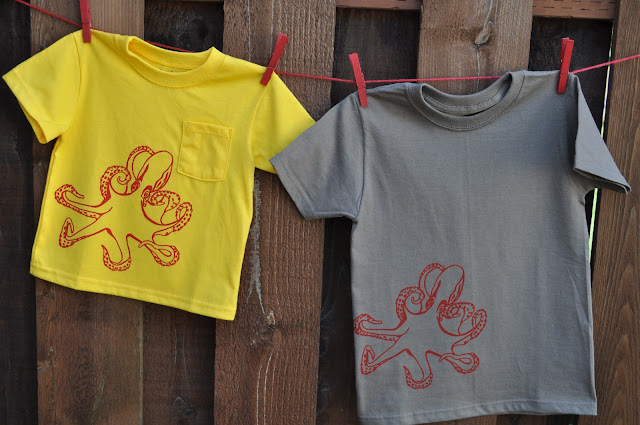
Mr. Octopus

Right now, octopus are big in our house.  They are kinda funky creatures.  Somewhere along the line my oldest, Super T, decided he's all about them and my youngest, Super K, thinks anything big bro likes must be cool.  When Super T falls, he falls hard.  Lucky for him I'm a mom who likes to encourage their current loves (so far we've experienced tractors, tires and wheels, dinos, sharks, Spiderman, swords and guns, buffalo, Roy Rogers, battleships, tanks and chainsaws).  All boy.

I looked up several photos of octopus online because I've never really taken the time to study what one really looks like and started drawing up a black and white design:


Here is Mr. Octopus "cooking" under my lamp (photo emulsion screen printing process...see this post for links on detailed tutorials for that process.

The final result for my boys.  I'm really liking how this turned out.  


Saturday, March 3, 2012

Ikea love.

On my most recent trip to Ikea, I discovered these racks/baskets in their kitchen gadget area.  They fit spools of ribbon P-E-R-F-E-C-T-L-Y with easy access to individual spools!   I believe I bought this whole set up right here for around $13.  That makes me happy.  Just thought I'd share.

HAPPY ORGANIZING!

Friday, March 2, 2012

Stamping Washers - tutorial

Awhile back I posted here about my epic fail related to my attempt to make sterling silver stamped jewelry.  I still laugh at myself over it.

Since I've been able to embrace that epic fail and realize jewelry making is not my strong point, I've scaled down to something less expensive when I screw up, but still useful, creative and different.

Stamping on washers is a LOT less intimidating and much cheaper than on the good stuff (I still mourn all the sterling silver disks I destroyed in my first attempt).  It still looks cool...and has endless possibilities for uses.  Gift tags, jewelry with an industrial vibe, funky labels...I've even used stamped washers to embellish handmade cards.

Here is what you need:


1) A steel bench block of some sort.  My father-in-law gave me this one out of his machine shop, but you can actually purchase a similar one like this Premium Steel Bench Block from Rio Grande.  I've ordered quite a few jewelry making products from Rio Grande and have been quite happy with their prices, selection and service.

2)  A stamping set.  I got this basic one at Harbor Freight for less than $10, but you can also order sets with fancy lettering and in different fonts from Rio or other jewelry making supply stores. My set happens to have 1/8" letters.

3)  Washers wide enough to accommodate the letter size of your stamps.  I had 3/8" on hand for this project, but in hindsight it would have been better to have wider washers.

4)  A Sharpie marker with a fine tip.

5)  A jewelry polishing pad of some sort.  I used these polishing pads which worked great.

 6)  Oh...and I almost forgot one of the most essential tools...a household hammer.


This is what my basic stamp set looks like.  It is actually intended for stamping identifying marks into metal tools, hence being sold at Harbor Freight, but works swell for my purposes.


First, find a hard surface that won't be damaged by the pounding of a hammer on a steel block.  I used my cement garage floor.  Place your washer on the block, select your letter, and position it over your washer.  Hold it down as firmly and as steady as you can.  Washers are made of pretty hard metal, so you will have to whack it pretty hard.  I give mine 3 good hits (if you choose to stamp sterling silver or copper, keep in mind it is  MUCH softer).  It is essential that you hold that letter post steady and firmly otherwise it has the desire to jump around on you which will mess up your impression.  Don't get frustrated if your first washer isn't perfect...this takes practice to get the feel of it...not to mention the cool thing about stamping is the one-of-a-kind nature and the imperfections that in turn make it perfect!


Once you have your washer stamped the way you want it, take your Sharpie and color in the grooves.  Make sure the ink really gets down in them as this is what will make your letters stand out.

After coloring your letters, take your jewelry polish pad and start buffing off the ink surrounding the letters, as well as the rest of the washer until it is nice and shiny.  The ink that got pushed down inside the impressions will stay.

Your fingers and the polish pad will turn all black but this grime will come off your hands with a soapy scrubbing.  I toss the polish pad once all the white turns black after several uses.

Wha-la!  You now have yourself a cool looking, artsy stamped circle!  I'm using mine as an embellishment to a friend's gift...
HAPPY STAMPING!

Wednesday, February 29, 2012

Supplies Needed For Screen Printing On Fabric

I used to screen print in college (we won't say how long ago that was) and loved it.  I minored in Art and would have liked to take more classes had I thought such a career would actually have a big chance at supporting me above poverty level.  And at the time I needed to support myself and fast!  So...I majored in Criminal Justice but that is a whole different story.

Back to screen printing on fabric...
 A shirt I recently printed of a propeller for my boat-loving Super T using the drawing fluid/screen filler method


I'm re-learning the processes for screen printing.  As you can see from my previous post here I've already had an epic fail of reading directions when using the emulsion method.  One I'm learning from though...I found some rubber gloves.

After deciding to dive back into screen printing ('cuz I seem to need to add something else on my plate while running after my toddler and preschooler, right?) I realized I had one big problem.  I got rid of all my supplies after college.  Dang it!

Since I'm a bargain shopper I hopped on Craigslist to see if a miracle might occur and someone was parting with screen printing supplies.  Low and behold...a local t-shirt printing business was selling a huge lot of wood screens in excellent condition as they were changing to aluminum framed.  They were selling the wood framed screens for...get ready for this...$3 each!  Yes, 3 bucks!  I got myself eight (yes 8!!) screens of varying mesh count in awesome condition for what I could buy two for brand new.  Score!

If you've been thinking about dabbling in screen printing on fabric, but are overwhelmed by the products out there, this post is for you.  Hopefully it will help you sort out what's what so you can decide which method(s) you want to try.  It really isn't as daunting as one might think.  Actually, it is addicting once you get going. There are some awesome tutorials of various methods already online, so I'm not going to repeat those.  I'm simply going to outline what a "hobby screen printer" might have for a set up as inspiration for you.

You don't need a fancy professional screen printing studio or crazy-big space to produce fun prints.  I have a simple, small bedroom that I've turned into my "craft studio".  In there I do anything and everything crafty except build with wood and power tools.  To do that I invade the "man cave" belonging to the Mr. 

This is my main work space for when I have my screens out and am working on them.  On this table I prepare my screen for inking (with whatever process I happen to choose for the specific design I've got going on). It is just a dresser that the Mr. made into a craft table for me by adding an extended laminated plywood top. 

This is a small table I do my inking up and printing on - it is totally beat up so I don't really care if it gets ink on it.  There is a sanded, wax paper covered board on top that is the perfect size to slip inside youth and adult t-shirts to aid in getting a smooth print. 

Underneath the table is the perfect size space for storing my extra screens, wrapped in plastic bags to keep the dust away (hardwood floors in my house seem to have dust bunnies giving birth to dust bunnies!).


In a small space that must be multi-functional, organization is key!  I have a drawer that most of my supplies fit into.  I do plan to build my ink supply, but for now, this works.


Lastly, you need a clean up space.  It is really the messiest part of it all.  I use our laundry tub, which is the perfect size to fit my screen and allow me room to scrub and rinse.  You could also use a bathtub, but make sure to scour it well afterwards to avoid stains from the inks and chemicals.


 If using photo emulsion you need a dark space for the screen to dry.  I use a cupboard that isn't opened during the day or a dark window-less closet.  


Laid out here is all that a "dabbler" needs for all three screen printing methods:  1) The use of a stencil.  2)  The use of screen filler and drawing fluid.  3)  Photo emulsion.

To aid you in deciding what method(s) you might like to try, I'm listing some of my favorite tutorials here.  You will also find a ton of different techniques and tutorials listed on Pinterest.  Keep reading past the links below to see what supplies are needed for each method.

Stencil:
See Kate Sew
Lil Blue Boo
Homes

Drawing Fluid & Screen Filler:
Instructables.com
Blick Art Supplies  (link to tutorial video)

Photo Emulsion:
Lil Blue Boo (using sunlight)
Lil Blue Boo (cleaning and removing emulsion)
Instructables.com (using artificial light)
Blick Art Supplies (link to tutorial video)


SUPPLIES:
Please keep in mind there are various techniques for each method, and I'm just outlining supplies I personally use.  For all methods you will be needing a screen*, squeegee ( with rounded edge for printing on fabric), something to prop the screen up (I use two long wooden boards), scissors and tape (for taping off edges), wax paper (or cardboard/newspaper) to lay directly under the layer of fabric you are printing on so ink doesn't seep through.

*A note about screens...there are various mesh counts available.  Basically, the thicker the ink (white is super thick), the larger holes you want in your mesh (like a 110/sq. inch or so).  They thinner the ink (which tend to be your darker inks), the smaller holes you want (like a 155 or so).

Also helpful will be newspaper for protecting surfaces, paper towels and rags, an apron or smock, rubber gloves for use when handling chemicals and during screen clean up, as well as a scrub brush for washing screens.  I keep a good liquid dish soap on hand by my laundry tub too, for help in scrubbing out ink.


STENCIL METHOD:
Here are the basics for what you would be using a stencil method.  Mask Ease or contact paper to make your stencils which will act as "ink blockers", and ink made for printing on fabric.  I like Speedball water soluble, but there are various brands available.

DRAWING METHOD:
For the drawing method, you'll need drawing fluid and screen filler.  Again, I use the Speedball brand.  You will also need a solution to remove the dried screen filler.  There are commercial screen cleaners on the market like this  or you can make your own solution like I did of 1 cup Arm & Hammer Washing Soda to 1 gallon water.  Used with warm water it works like a charm and is way cheaper.

PHOTO EMULSION:
Photo emulsion method may be the most intimidating, but is really quite fun.  You'd need a bottle of photo emulsion, sensitizer (not shown as I spaced photographing it at tossed the bottle), and a bottle of photo emulsion remover.  Shown here is Speedball.  You'll also need rubber gloves when handling it.

Transparencies are needed to transfer your image to via computer printer or black marker, and a piece of clear glass helps to stack on top of the transparencies and screen during the time you are burning the image onto the screen, resulting in a nice crisp image. I edged my glass with masking tape to protect my hands from the sharp edges.


For screen burning, you'll need to either use the sun on a really bright day or artificial light like this shop light (look in the auto section of your local department store) and a 150V clear incandescent bulb.   Also helpful is a dark surface to set your screen on during this time (like a dark counter top or black fabric) which will cut down on reflection and help with the exposure process.

OTHER HANDY TOOLS FOR ANY METHOD:  
 You may want some disposable foam brushes for use with clean-up chemicals, plastic spoons for scooping ink and other fluids onto screens before squeegeeing (is that a word?) it, little paintbrushes for applying various liquids like drawing fluid, and Sharpie markers for making black designs during the emulsion method.  Also keep the handy dandy instruction pamphlets around that come with your inks and chemicals as they are awesome to refer to if you are a beginner.

Screen printing is a lot of fun once you collect all your supplies and get the basics down for the method you want to try.  Don't let it intimidate you!  Your creativity can soar with this hobby!  HAPPY PRINTING!


Sunday, February 26, 2012

Kid Friendly Caramel Corn With Chocolate


My son had a school assignment where he was asked to complete a fun recipe at home and bring photos and a sample to preschool to share.  We chose a caramel corn recipe (which I've had written down on scrap paper for over a decade now and have no idea where it originated from) and switched it up a tad bit by adding chocolate chips.  Because who doesn't like sugar on sugar???

This recipe is very kid-friendly for preschoolers, with the supervision of an adult due to working over a hot burner and oven.  With instruction, my kiddo was able to do most of the process himself, taking care to not touch hot surfaces. 

You will need:
4 quarts (or about 1.5 microwave bags) of popcorn
1 cup butter
2 cups brown sugar
1/2 cup corn syrup
1 tsp salt
1/2 tsp baking soda
1 tsp vanilla
chocolate chips (optional)
***Please don't judge me by the condition of my burners...I wasn't about to scrub off spillage from last night's dinner before I had a preschooler working on my stove with sticky stuff!***


Preheat oven to 250 degrees.

First, pop the corn to set aside until later.  I prefer to make popcorn the old fashioned way over the stove top in a kettle, but with an impatient 5 year old I decided to make things happen quickly with 1.5 bags of microwave popcorn (lightest salt and butter flavor I could find).


Melt the butter in a saucepan on the stove top, stirring constantly.  Add your brown sugar, corn syrup and salt.


Stir on medium heat until the mixture comes to a boil.  Boil for 4 minutes.  Keep stirring...you don't want it to burn. 


Remove from heat, add the vanilla and baking soda.  Stir until mixed well.

Make sure your corn is in a heat-resistant, deep pan.  Pour the caramel mixture over the corn and stir until coated well.


Lay coated corn out on deep sided cookie sheets or a baking pan of your choice.  I sprayed the pan with non-stick spray first, but I'm not sure that was necessary.

Bake at 250 degrees for 30 minutes.  Remove from oven, stir, sprinkle in chocolate chips, and bake for another 30 minutes.

Let cool, divide, and enjoy! This makes a great holiday gift or party favor, too.  It is really good this batch is headed to preschool, or my hips would suffer the consequences.

Directions? What directions?

I learned something today.  I learned that I really should abide by the directions listed on a bottle of chemicals.  The whole "wear protective rubber gloves when handling product"  just didn't seem to apply to me at the time.  I mean, who has the time to disrupt their mo-jo and hunt down a pair of rubber gloves?  Not me!  Now I know that they put such words on the label specifically for the stubborn (ahem...like me).

Dear Brain In My Head,
     Next time do not allow your person to open a bottle of photo sensitizer and emulsion, taking no care to avoid it getting on your bare thumbs, lest you want to experience the burning feeling of it eating into your skin for hours afterwards.  Not smart. 

               Sincerely,
                     Self


I've never had a chemical burn before but they are surprisingly painful for their pathetic little size.  I stole a couple of my kid's Scooby Doo bandages to sport tonight.

For the record, I hate following the directions on sewing patterns too.  I'm impatient for my end result and would rather take short cuts.  No risk of chemical burns there though, so it's all good.

A dabble here, a dabble there

My youngest son with last summer's strawberries...maybe this photo will inspire some summer weather to come to Oregon! 

 
I just changed my blog name.  Why?  Because I'm a dabbler by nature.  "The Groovy Mess" seems to fit me and my life better.  Not to mention that my former blog name, "Badonkadonk Knits" was selected because I was knitting custom orders of baby attire, which I'm taking a break from for now.  I might start that up again in the near future under The Groovy Mess.

I fantasize about my "someday crafting" a lot. Someday I'd like to quit dabbling and streamline my crafting a little more.  Someday I'd like to get really good at just one.  Someday I'd even like to start a crafting business.  I mean a REAL crafting business...one that actually makes money.  I have several blogs bookmarked that I follow (or stalk?) featuring women who have done this.  Started out with a dinky little blog outlining their hobby crafting and eventually it mushroomed into something really, well, business-like.

I often think that if I could just get myself organized enough and focused enough and educated enough in certain areas, then I could do it too!   I will admit there is quite a bit of fear holding me back though.  Fear that I will embark on something and fail, I guess.  Fear of the internet and my lack of knowledge of things like how websites run and how to get my own.  Concepts like domain names, web hosts, copyrights and trademarks float around in my head at night and overwhelm me.   I find myself a bit intimidated by the thought of putting my creative juices into something and then putting it on a site like Etsy, only to have it sit there with no one thinking it is as cool as I do.  Yikes!  Maybe someday...when my young kids are both in school and I can quit spending my time fishing out those random items thrown into our toilets for good (the latest of which was a full bar of soap courtesy of our 2 year old).

In the meantime, I still dabble.  Sewing and more sewing, refashioning clothing, repurposing thrift store finds, jewelry making, knitting, wood working, a little photography (not that I'm great at it, but I like it), and my newest revisited love...screen printing (more on that in a future post for sure).  Oh, and let's not even talk about what Pinterest has done to me!  Oh the endless possibilities.  Eye candy for the crafter to be found there, folks!


Here are some of my recent favorites off of Pinterest that I'm determined to try: